Integrations
A growing list of guides on integrating Terrascan with different tools in the software development lifecycle.
Terrascan can be integrated into many tools in the development pipeline. When integrated into a tool, vulnerability scanning is automated as part of the commit or build process.
It can run on a developer’s laptop, a SCM (e.g. GitHub), and CI\CD servers (e.g. ArgoCD and Jenkins). It also has a built in Admission Controller for Kubernetes.
Please see the following guides for integrating Terrascan in different use cases. If the product you want to integrate with is not listed, do not fret. Terrascan supports many output formats (YAML, JSON, XML, JUNIT-XML and SARIF) to suit the variety of tools in the ecosystem. For example, it’s straightforward to integrate with Jenkins using the JUNIT-XML format.
Go to the Usage page for more details.
Community Guides and Blogs:
Our Integration Guides:
1 - Kubernetes Admission Controller
Configure Terrascan as a Kubernetes Admission Controller
Overview
Terrascan can be integrated with K8s admissions webhooks.
Admission controllers help you control resources created on a kubernetes cluster. By using Terrascan as an admission controller, resources violating security policies can be prevented from getting created in a Kubernetes cluster.
Note on SSL certificates: You can use valid SSL certificates or create self signed certificates and have your Kubernetes cluster trust it.
Installation Guide
To configure Terrascan as an admission controller, follow these steps:
- Create an instance of Terrascan which meets specified requirements as detailed below. Ensure Terrascan is accessible via HTTPS from the kubernetes API server.
- Create Terrascan config file.
- Run Terrascan in server mode.
- Configure a ValidatingWebhookConfiguration resource in kubernetes cluster pointing to the Terrascan server.
- Test your set up.
Step 1: Create an instance of Terrascan
Create an instance of Terrascan. To scan K8s configurations, your Terrascan instance must meet the following requirements.
- Make sure Terrascan is accessible via HTTPS. Ensure your cloud firewall is configured to allow this.
- Have a valid SSL certificate for the served domain name using one of the suggested methods below:
- Use a subdomain of your choice (e.g dev-terrascan-k8s.tenable.com) and create a valid certificate for this subdomain through your SSL certificate provider. You can use Let’s Encrypt which is a free, simple to use certificate authority.
- Use a reverse-proxy to serve SSL requests; for example, use Cloudflare Flexible to get a certificate by a trusted-CA to your self-signed certificate.
- Generate a self-signed certificate and configure your K8s cluster to trust it. To add a trusted CA to ca-pemstore, as demonstrated in paraspatidar’s blog post.
- Use the Terrascan docker as demonstrated in this document, or run it from the sources.
Step 2: Create a Terrascan config file
For instructions to create a config file, see Usage
. You can create a config file that specifies which policies to use in the scan and which violations should be rejected during admission.
- Policies below the [severity] level will be ignored.
- Policies below the [k8s-admission-control] denied-severity will be logged and displayed by Terrascan, but will not lead to a rejected admission response to the k8s API server.
Sample config file
A config file example: config.toml
  [severity]
  level = "medium"
  [rules]
      skip-rules = [
          "accurics.kubernetes.IAM.107"
      ]

  [k8s-admission-control]
    denied-categories = [
        "Network Ports Security"
    ]
    denied-severity = "high"
    dashboard=true
You can specify the following configurations:
- scan-rules - one or more rules to scan
- skip-rules - one or more rules to skip while scanning
- severity - the minimal level of severity of the policies to be scanned and displayed. Options are high, medium and low
- category - the list of type of categories of the policies to be scanned and displayed
k8s-admission-control - Config options for K8s Admission Controllers and GitOps workflows:
- denied-severity - Violations of this or higher severity will cause and admission rejection. Lower severity violations will be warnings. Options are high, medium. and low
- denied-categories - violations from these policy categories will lead to an admission rejection. Policy violations of other categories will lead to warnings.
- dashboard=true - enable the
/logs endpoint to log and graphically display admission requests and violations. Default is false
Step 3: Run Terrascan in Server Mode
Run Terrascan docker image in your server using the following command:
sudo docker run -p 443:9443 -v <DATA_PATH>:/data -u root -e K8S_WEBHOOK_API_KEY=<API_KEY> tenable/terrascan server --cert-path /data/cert.pem --key-path /data/key.pem -c /data/config.toml
Where,
<API_KEY> is a key used for authentication between your K8s environment and the Terrascan server. Generate your preferred key and use it here.<DATA_PATH> is a directory path in your server where both the certificate and the private key .pem files are stored.
This directory is also used to save the webhook logs. (Logs are in saves in SQLite file format)
Configure a new ValidatingWebhookConfiguration in your Kubernetes environment and specify your Terrascan server endpoint.
Example:
  cat <<EOF | kubectl apply -f -
  apiVersion: admissionregistration.k8s.io/v1
  kind: ValidatingWebhookConfiguration
  metadata:
    name: my.validation.example.check
  webhooks:
    - name: my.validation.example.check
      rules:
        - apiGroups:
            - ""
          apiVersions:
            - v1
          operations:
            - CREATE
            - UPDATE
          resources:
            - pods
            - services
      failurePolicy: Fail
      clientConfig:
        url: https://<SERVER_ADDRESS>/v1/k8s/webhooks/<API_KEY>/scan
      sideEffects: None
      admissionReviewVersions: ["v1"]
  EOF
- You can modify the
rules that trigger the webhook according to your preferences.
- Update the
clientConfig URL with your terrascan server address and the API key you generated before.
Step 5: Test your settings
Try to run a new pod / service. For example:
kubectl run mynginx --image=nginx
Go to https://<SERVER_ADDRESS>/k8s/webhooks/<API_KEY>/logs and verify your request is logged.
2 - Argo CD
Terrascan can be configured as an Argo CD job during the application sync process using ArgoCD’s resource hook.
Terrascan can be integrated with Argo CD in two ways
- Use terrascan as a pre-sync hook to scan remote repositories
- Use terrascan’s k8s admission controller along with a pre-sync that scans a configured repository with the admission controller webhook
The following example of a hook yaml is nearly ready to be added to an existing kubernetes configuration. To complete the configutation, you need to:
- Ensure that the secrets,
known_hosts, and ssh_config volume are relevant for your specific environment.
- Specify a terrascan image.
You can also map a slack notification script to the container which will send notifications to your Slack webhook endpoint after the embedded script scans the repo.
apiVersion: batch/v1
kind: Job
metadata:
 generateName: terrascan-hook-
 annotations:
   argocd.argoproj.io/hook: PreSync
spec:
 ttlSecondsAfterFinished: 3600
 template:
   spec:
     securityContext:
       seccompProfile:
         type: RuntimeDefault
     volumes:
       #add a configmap for the slack notification scripts
       - name: notification-scripts
         configMap:
           name: slack-notifications
       #add all required ssh keys need to clone your repos
       - name: ssh-key-secret
         secret:
           secretName: ssh-key-secret
       #add a secret for git config file
       - name: ssh-config
         secret:
           secretName: ssh-config-secret
       #add a configmap for the ssh known_hosts file
       - name: ssh-known-hosts
         configMap:
           name: known-hosts-config
     containers:
     - name: terrascan-argocd
       image: <terrscan-image>
       resources:
         requests:
           cpu: "1"
           memory: "256Mi"
         limits:
           cpu: "1"
           memory: "256Mi"
       command: ["/bin/sh", "-c"]
       args:
       - >
         cp /etc/secret-volume/ssh-private-key /home/terrascan/.ssh/id_ed25519_github &&
         cp /etc/ssh-config-secret/ssh-config /home/terrascan/.ssh/config &&
         cp /etc/ssh-known-hosts-secret/ssh-known-hosts /home/terrascan/.ssh/known_hosts &&
         chmod -R 400 /home/terrascan/.ssh/* &&
         /go/bin/terrascan scan -r git -u <YOUR REPOSITORY PATH>-i k8s -t k8s | /data/notify_slack.sh webhook-tests argo-cd https://hooks.slack.com/services/TXXXXXXXX/XXXXXXXXXXX/0XXXXXXXXXXXXXXXXXX
       securityContext:
         seccompProfile:
           type: RuntimeDefault
         allowPrivilegeEscalation: false
         runAsNonRoot: true
         runAsUser: 101
       livenessProbe:
         exec:
           command:
           - /go/bin/terrascan
           - version
         periodSeconds: 10
         initialDelaySeconds: 10
       readinessProbe:
         exec:
           command:
           - /go/bin/terrascan
           - version
         periodSeconds: 10
       #if want to use private repo
       volumeMounts:
         - mountPath: /etc/secret-volume
           name: ssh-key-secret
           readOnly: true
         - mountPath: /etc/ssh-config-secret
           name: ssh-config
           readOnly: true
         - mountPath: /etc/ssh-known-hosts-secret
           name: ssh-known-hosts
           readOnly: true
         - mountPath: /data
           name: notification-scripts
           readOnly: true

     restartPolicy: Never
 backoffLimit: 1
Note: As shown above, the PreSync requires access to the repository where IaC is stored, using the same branch (default) as the ArgoCD application pipeline.
To allow users to check for violations in the web interface, configure the job to delete after the specified time, using the parameter ttlSecondsAfterFinished. In addition, violation can be reported as webhook notifications, as shown below.
Example slack notification script
#!/bin/sh

function send_slack_notificaton {
  channel=$1
  username=$2
  slack_hook=$3

  curl -X POST --data-urlencode payload="{\"channel\": \"#${channel}\", \"username\": \"${username}\", \"text\": \" \`\`\` $(cat results.out) \`\`\` \", \"icon_emoji\": \":ghost:\"}" ${slack_hook}
}

if [ -p /dev/stdin ]; then
  echo "processing terrascan results"
  while IFS= read line; do
          echo "${line}" | tr '\\"' ' ' >> results.out
  done

  cat results.out

  send_slack_notificaton $1 $2 $3

  echo "notification exit code: $?"
else
  echo "no response skipping"
fi
For private repositories, the private following keys must be added as kubernetes secret:
private key and ssh config as Secretknown_hostsas ConfigMap
 kubectl create secret generic ssh-key-secret \
   --from-file=ssh-privatekey= < path to your private key > \
    --from-file=ssh-publickey=< path to your public key >
Config-map:
kubectl create configmap ssh-known-hosts --from-file=< path to your known hosts file >
kubectl create configmap slack-notifications --from-file=< path to your notification script >
ssh config secret
 kubectl create secret generic ssh-config-secret \
   --from-file=< path to your ssh config file >
Example ssh config file
 Host github.com
  HostName github.com
  IdentityFile ~/.ssh/id_ed25519_github
After configuring the presynchook yaml file, add the file to the relevant repository folder to configure Argo CD.
Method 2. Use PreSyncHook to trigger the Terrascan Server Service
You can use a pre-deployed terrascan server service in K8s cluster to scan the remote repository from Argo CD PreSync hook.
To configure, follow these steps:
apiVersion: apps/v1
kind: Deployment
metadata:
name: terrascan-server
labels:
  app: terrascan
spec:
replicas: 1
selector:
  matchLabels:
    app: terrascan
template:
  metadata:
    labels:
      app: terrascan
  spec:
    containers:
    - name: terrascan
      image: <TERRASCAN LATEST IMAGE>
      resources:
        limits:
          memory: "256Mi"
          cpu: "1"
      ports:
        - containerPort: 443
      livenessProbe:
        initialDelaySeconds: 30
        periodSeconds: 10
        timeoutSeconds: 5
        httpGet:
          path: /health
          port: 443
          scheme: HTTPS
      env:
        - name: K8S_WEBHOOK_API_KEY
          value: yoursecretapikey
      volumeMounts:
        - mountPath: /data/certs
          name: terrascan-certs-secret
          readOnly: true
        - mountPath: /data/config
          name: terrascan-config
          readOnly: true
        - mountPath: /etc/secret-volume
          name: ssh-key-secret
          readOnly: true
        - mountPath: /etc/ssh-config-secret
          name: ssh-config
          readOnly: true
        - mountPath: /etc/ssh-known-hosts-secret
          name: ssh-known-hosts
          readOnly: true
      command: ["/bin/sh", "-c"]
      args:
        - >
          cp /etc/secret-volume/ssh-private-key /home/terrascan/.ssh/id_ed25519_github &&
          cp /etc/ssh-config-secret/ssh-config /home/terrascan/.ssh/config &&
          cp /etc/ssh-known-hosts-secret/ssh-known-hosts /home/terrascan/.ssh/known_hosts &&
          chmod -R 400 /home/terrascan/.ssh/* &&
          terrascan server --cert-path /data/certs/server.crt --key-path /data/certs/server.key -p 443 -l debug -c /data/config/config.toml
    volumes:
      #add all required ssh keys need to clone your repos
      - name: ssh-key-secret
        secret:
          secretName: ssh-key-secret
      #add a secret for git config file
      - name: ssh-config
        secret:
          secretName: ssh-config-secret
      #add a configmap for the ssh known_hosts file
      - name: ssh-known-hosts
        configMap:
          name: known-hosts-config
      #add a configmap for the terrascan config.toml file
      - name: terrascan-config
        configMap:
          name: terrascan-config
      #add a secret for the tls certificates
      - name: terrascan-certs-secret
        secret:
          secretName: terrascan-certs-secret
Service example
apiVersion: v1
kind: Service
metadata:
  name: terrascan-service
spec:
  selector:
    app: terrascan
  ports:
  - port: 443
    targetPort: 443
For private repositories, the following private keys needs to be added as a kubernetes secret:
private key and ssh config as Secretknown_hostsas ConFigmap
kubectl create secret generic ssh-key-secret \
  --from-file=ssh-privatekey= < path to your private key > \
  --from-file=ssh-publickey=< path to your public key >
kubectl create secret generic terrascan-certs-secret \
  --from-file= < path to your .key file > \
  --from-file= < path to your .crt file >
Config-map:
kubectl create configmap ssh-known-hosts --from-file=< path to your known hosts file >
kubectl create configmap terrascan-config --from-file=<path to your config.toml file >
ssh config secret
kubectl create secret generic ssh-config-secret \
  --from-file=< path to your ssh config file >
Example ssh config file
Host github.com
  HostName github.com
  IdentityFile ~/.ssh/id_ed25519_github
After making changes to the webhook deployment file, apply this yaml in your cluster.
You can also run terrascan admission controller server outside cluster, for more information and instructions on configuring terrascan as an admission controller webhook, see https://runterrascan.io/docs/integrations/k8s/.
Step 2: Create a Dockerfile
Create a Dockerfile for the container. This container will run the script that triggers the remote Terrascan API server. The template for the script is below, after the Dockerfile. Please fill the values in the template to match your environment.
# Dockerfile with a script to use terrascan's validating webhook
# configured in the kubernetes cluster, to scan a repo for violations
FROM alpine:3.12.0

#curl to send request to terrascan validating webhook
RUN apk add --no-cache curl

WORKDIR /home/terrascan

RUN mkdir bin

COPY scripts/argocd-terrascan-remote-scan.sh  bin/terrascan-remote-scan.sh

# create non root user
RUN addgroup --gid 101 terrascan && \
  adduser -S --uid 101 --ingroup terrascan terrascan && \
  chown -R terrascan:terrascan bin && \
  chmod u+x bin/terrascan-remote-scan.sh

USER 101

CMD ["sh"]
The terrascan-remote-scan script
#!/bin/sh

set -o errexit


TERRASCAN_SERVER="https://${SERVICE_NAME}"
IAC=${IAC_TYPE:-"k8s"}
IAC_VERSION=${IAC_VERSION:-"v1"}
CLOUD_PROVIDER=${CLOUD_PROVIDER:-"all"}
REMOTE_TYPE=${REMOTE_TYPE:-"git"}

if [ -z ${SERVICE_NAME} ]; then
    echo "Service Name Not set"
    exit 6
fi

if [ -z ${REMOTE_URL} ]; then
    echo "Remote URL Not set"
    exit 6
fi

SCAN_URL="${TERRASCAN_SERVER}/v1/${IAC}/${IAC_VERSION}/${CLOUD_PROVIDER}/remote/dir/scan"

echo "Connecting to the service: ${SERVICE_NAME} to scan the remote url: ${REMOTE_URL} \
  with configurations { IAC type: ${IAC}, IAC version: ${IAC_VERSION},  remote type: ${REMOTE_TYPE} , cloud provider: ${CLOUD_PROVIDER}}"


RESPONSE=$(curl -s -w \\n%{http_code} --location -k  --request POST "$SCAN_URL" \
--header 'Content-Type: application/json' \
--data-raw '{
"remote_type":"'${REMOTE_TYPE}'",
"remote_url":"'${REMOTE_URL}'"
}')

echo "$RESPONSE"

HTTP_STATUS=$(printf '%s\n' "$RESPONSE" | tail -n1)

if [ "$HTTP_STATUS" -eq 403 ]; then
    exit 3
elif [ "$HTTP_STATUS" -eq 200 ]; then
    exit 0
else
    exit 1
fi
The following example hook yaml is mostly ready to be added to an existing kubernetes configuration.
apiVersion: batch/v1
kind: Job
metadata:
generateName: terrascan-hook-
namespace: <YOUR APP NAMESPACE>
annotations:
  argocd.argoproj.io/hook: PreSync
spec:
ttlSecondsAfterFinished: 3600
template:
  spec:
    securityContext:
      seccompProfile:
        type: RuntimeDefault
    containers:
    - name: terrascan-argocd
      image: <IMAGE FROM STEP TWO>
      resources:
        requests:
          cpu: "1"
          memory: "256Mi"
        limits:
          cpu: "1"
          memory: "256Mi"
      env:
        - name: SERVICE_NAME
          value: <Name of service exposed for terrascan controller pod>
        - name: REMOTE_URL
          value: <YOUR PRIVATE REPOSITORY PATH>
        - name: IAC_TYPE
          value: <IAC TYPE YOU WANT SCAN> # If not provided default value is 'k8s'
        - name: IAC_VERSION
          value: <VERSION OF IAC TYPE SELECTED> # If not provided default value is 'v1'
        - name: CLOUD_PROVIDER
          value: <TYPE OF CLOUD PROVIDER> #If not provided default value is 'all'
        - name: REMOTE_TYPE
          value: <TYPE OF REMOTE> #If not provided default value is 'git'
      args:
      - sh
      - /home/terrascan/bin/terrascan-remote-scan.sh
      securityContext:
        seccompProfile:
          type: RuntimeDefault
        allowPrivilegeEscalation: false
        readOnlyRootFilesystem: true
        runAsNonRoot: true
        runAsUser: 101
      livenessProbe:
        exec:
          command:
          - cat
          - /home/terrascan/bin/terrascan-remote-scan.sh
        periodSeconds: 10
        initialDelaySeconds: 10
      readinessProbe:
        exec:
          command:
          - cat
          - /home/terrascan/bin/terrascan-remote-scan.sh
        periodSeconds: 10
        initialDelaySeconds: 10
    restartPolicy: Never
backoffLimit: 1
To allow users to check for violations in the web interface, configure the job to delete after the specified time, using the parameter ttlSecondsAfterFinished. In addition, violation can be reported as webhook notifications, as shown in Method 1.
After configuring the presynchook yaml file, add the file to the relevant repository folder to configure Argo CD.
Note: All the example yaml configuration files present in documentation are tested with k8s 1.19.7 version.
3 - Atlantis PR Automation
Atlantis is a pull request automation system designed to control Terraform execution from Github commits.
You can integrate Terrascan into an Atlantis setup using one of the two ways:
- Method 1: Atlantis Workflow-based integration which sends scan requests to an independently running terraform server
- Method 2: Custom Atlantis container image which has an integrated Terrascan
In either scenario, the configuration of Atlantis varies from installation to installation. For instructions to install, configure, and use Atlantis, see the Atlantis documentation.
Method 1: Workflow-based integration
In this method, you can modify or create a custom workflow for Atlantis so your repositories will be scanned by Terrascan as part of the pull request automation.
Requirements
The following requirements must be met before starting the integration workflow:
- The atlantis server must have TCP connectivity to where the terrascan server is running.
- The
curl command must be installed on the system so the terrascan-remote-scan.sh script can make the scan request. Atlantis’s docker image has curl preinstalled.
Integration steps for Workflow based integration
- Modify Workflow
- Configure the Script
- Run Atlantis
Modify Workflow
- Modify your workflow to call
terrascan-remote-scan.sh during the plan stage.
- See the ‘plan’ detailed below:
- the first three
run: terraform commands are the default for an atlantis workflow.
Note: The values for the variables $WORKSPACE and $PLANFILE referenced in the second and third run commands in the yaml below are automatically provided by atlantis
- The fourth
run terrascan-remote-scan.sh initiates the Terrascan scan request.
Note: By default, the terrascan-remote-scan.sh script can be found under the scripts directory in this project; copy this to a location where it can be executed by the Atlantis server.
If the terrascan-remote-scan.sh script is not in the directory where the Atlantis server command is being run to, you will have to specify the path to the script in the fourth run command.
repos:
- id: /.*/
  workflow: terrascan

workflows:
  terrascan:
    plan:
      steps:
        - run: terraform init -input=false -no-color
        - run: terraform workspace select -no-color $WORKSPACE
        - run: terraform plan -input=false -refresh -no-color --out $PLANFILE
        - run: terrascan-remote-scan.sh
Script configuration
Modify the terrascan-remote-scan.sh script according your environment. The script is located here. Open the script with your any editor of your choice and review the following six settings which is found at the top of the file:
TERRASCAN_SERVER=192.168.1.55
TERRASCAN_PORT=9010
IGNORE_LOW_SEVERITY=false
IAC=terraform
IAC_VERSION=v14
CLOUD_PROVIDER=aws
Descriptions of these settings are as follows:
TERRASCAN_SERVER is the hostname or IP address of the host running the terrascan server. This will be used by the script to submit the scan request.TERRASCAN_PORT is the TCP port which Terrascan server is listening on. By default, this is 9010.IGNORE_LOW_SERVERITY allows you to specify the scan response for low-severity findings in the code. During a scan if the terrascan-remote-scan.sh should fail a build if a low-severity finding is found. Some users will want to set this to true so they may ignore low-severity findings.IAC, IAC_VERSION, and CLOUD_PROVIDER are terrascan options. Descriptions and valid values can be found by running terrascan scan -h.
Running atlantis
Run Atlantis with the terrascan-workflow.yaml as a server-side repo configuration. The command for this depends on how you choose to deploy Atlantis.
If running the Atlantis binary directly, use the following command:
$ atlantis server \
--atlantis-url="$URL" \
--gh-user="$USERNAME" \
--gh-token="$TOKEN" \
--gh-webhook-secret="$SECRET" \
--repo-allowlist="$REPO_ALLOWLIST" \
--repo-config=terrascan-workflow.yaml
Note: The variables in the example above must be configured separately using export or similar shell methods.
Important: Before the first pull request is processed, run Terrascan in server mode using the following command:
Automated scanning and results
When the systems are running, if Atlantis is initiated either via a pull request, or via a comment of atlantis plan, Terrascan will be also be invoked as part of the atlantis plan flow. Scan results are reported as part of the pull request as comments, this notifies the reviewers before approving a requests. If any issues are found the test will be marked as failed.
Method 2: Custom Atlantis Container
Terrascan offers a custom container built on top of the official Atlantis container image, which allows users to run IaC scans with Terrascan, in addition to the usual atlantis usage. There’s a built-in atlantis workflow configured inside the
container which is ready to be used.
The default workflow.yaml file used is the atlantis/workflow.yaml in the Terrascan repo.
Alternatively, you can also override that default workflow using the --repo-config flag.
Steps to use the custom Atlantis container
In code repository, usage is exactly the same as atlantis, add a comment atlantis plan and atlantis plan to your Pull Requests to trigger the custom atlantis-terrascan workflow.
To use the default built-in container image:
docker pull tenable/terrascan_atlantis
To build your own container image:
docker build ./integrations/atlantis -t <image_name>
Run the container:
docker run \
--env-file=<.env-file> \
-p 4141:4141 \
-v <pwd>/config_data/:/etc/terrascan/ \
tenable/terrascan_atlantis server \
--gh-user="$USERNAME" --gh-token="$TOKEN" --gh-webhook-secret="$SECRET" \
--repo-allowlist="$REPO_ALLOWLIST" \
-c /etc/terrascan/config.toml
The syntax of the Atlantis server command here is same as in atlantis docs, except for an optional -c flag which can be used to specify the file path for the toml config to be used by Terrascan. Another way to provide the toml config filepath would be the TERRASCAN_CONFIG environment variable. You need to provide all the environment variables that terraform requires to operate with your respective cloud providers.
Note: As a good practice, Terrascan recommends use of a specific tag of the container image rather than the latest tag.
Running a scan
With everything configured, a local Terrascan scan will be triggered as part of the Atlantis plan workflow.
4 - GitHub and GitLab
Terrascan can be integrated into popular source code repositories
GitHub Action
The Terrascan GitHub Action can be used as part of GitHub workflows to scan your repository for IaC issues as part of code pushes or pull requests.
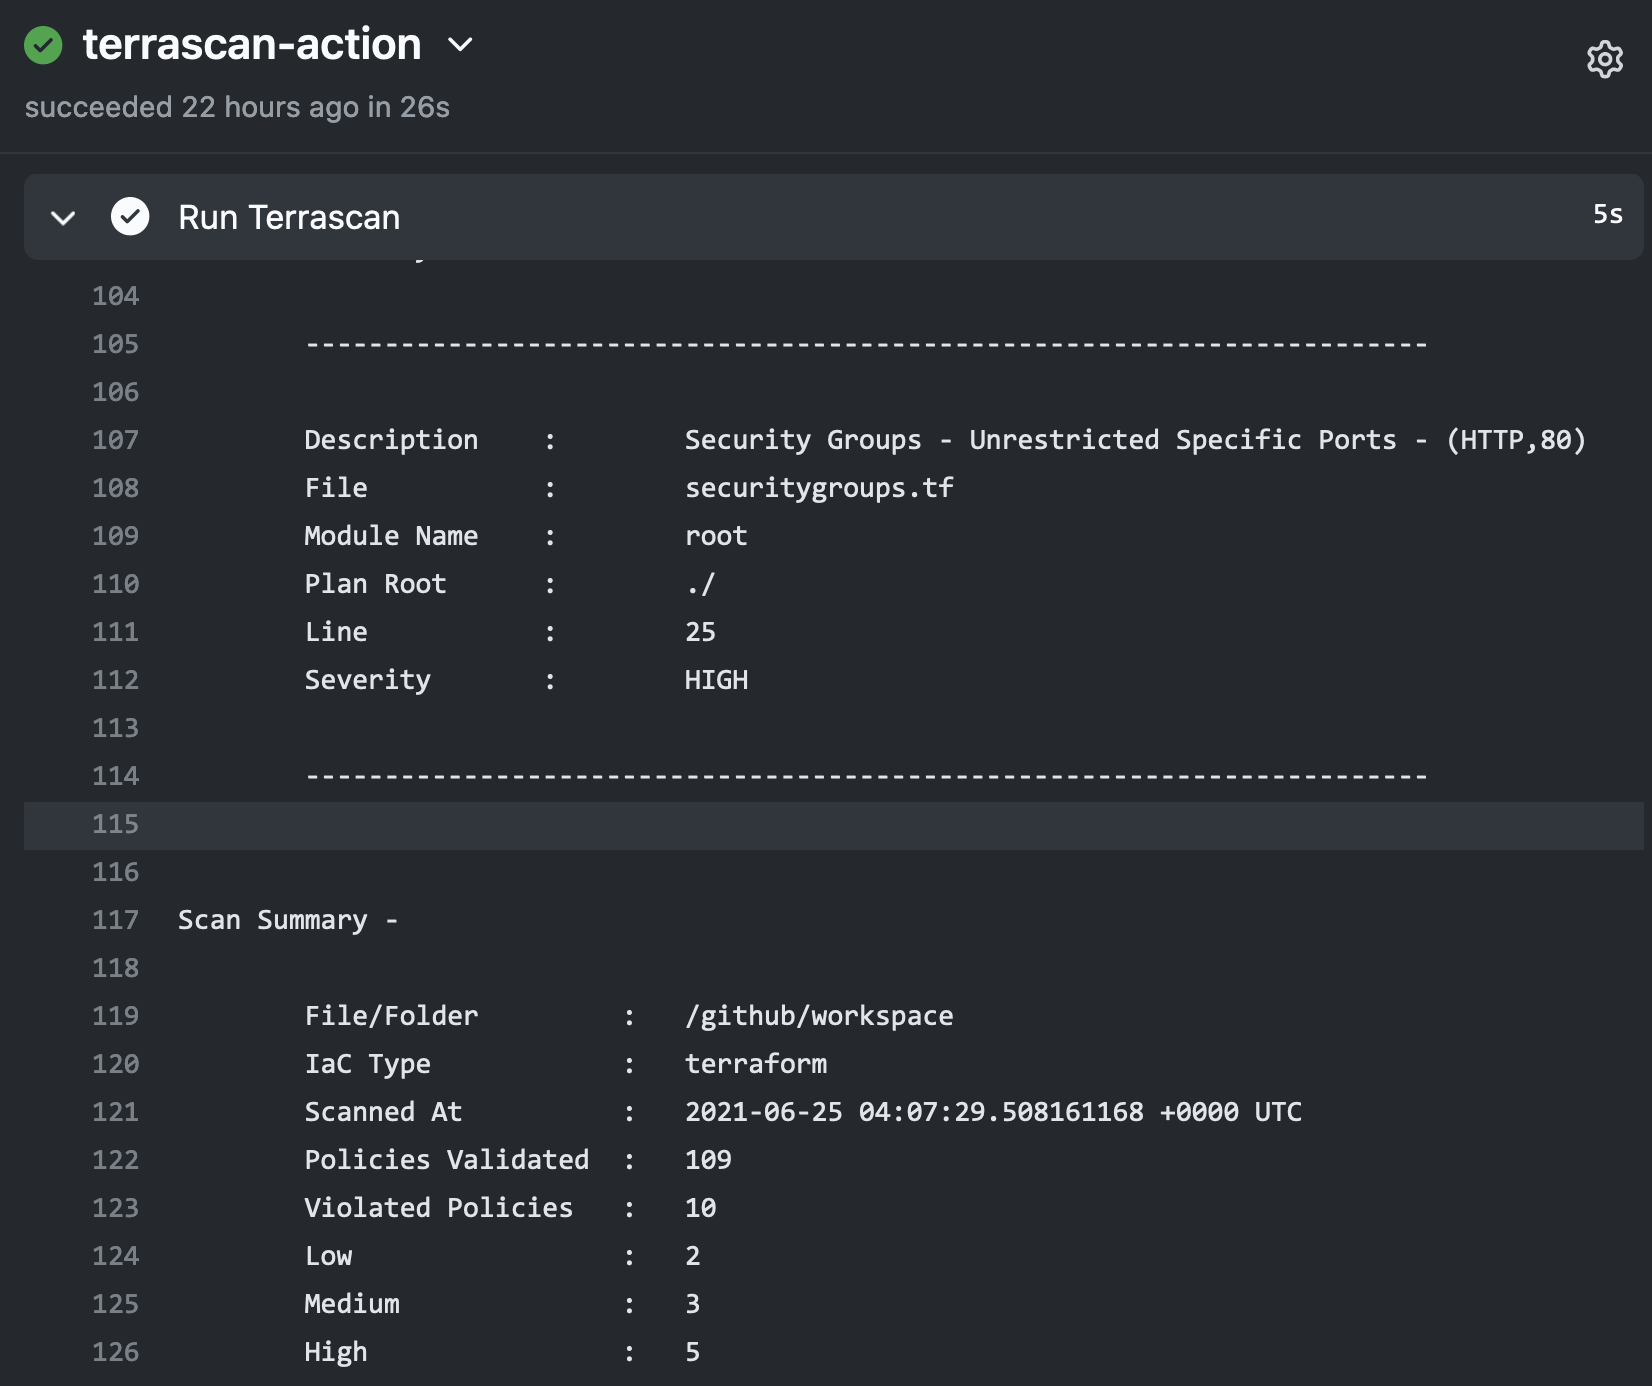
Using Terrascan’s SARIF output, the action can include issues found during the scan within GitHub’s code scanning results for the repository.
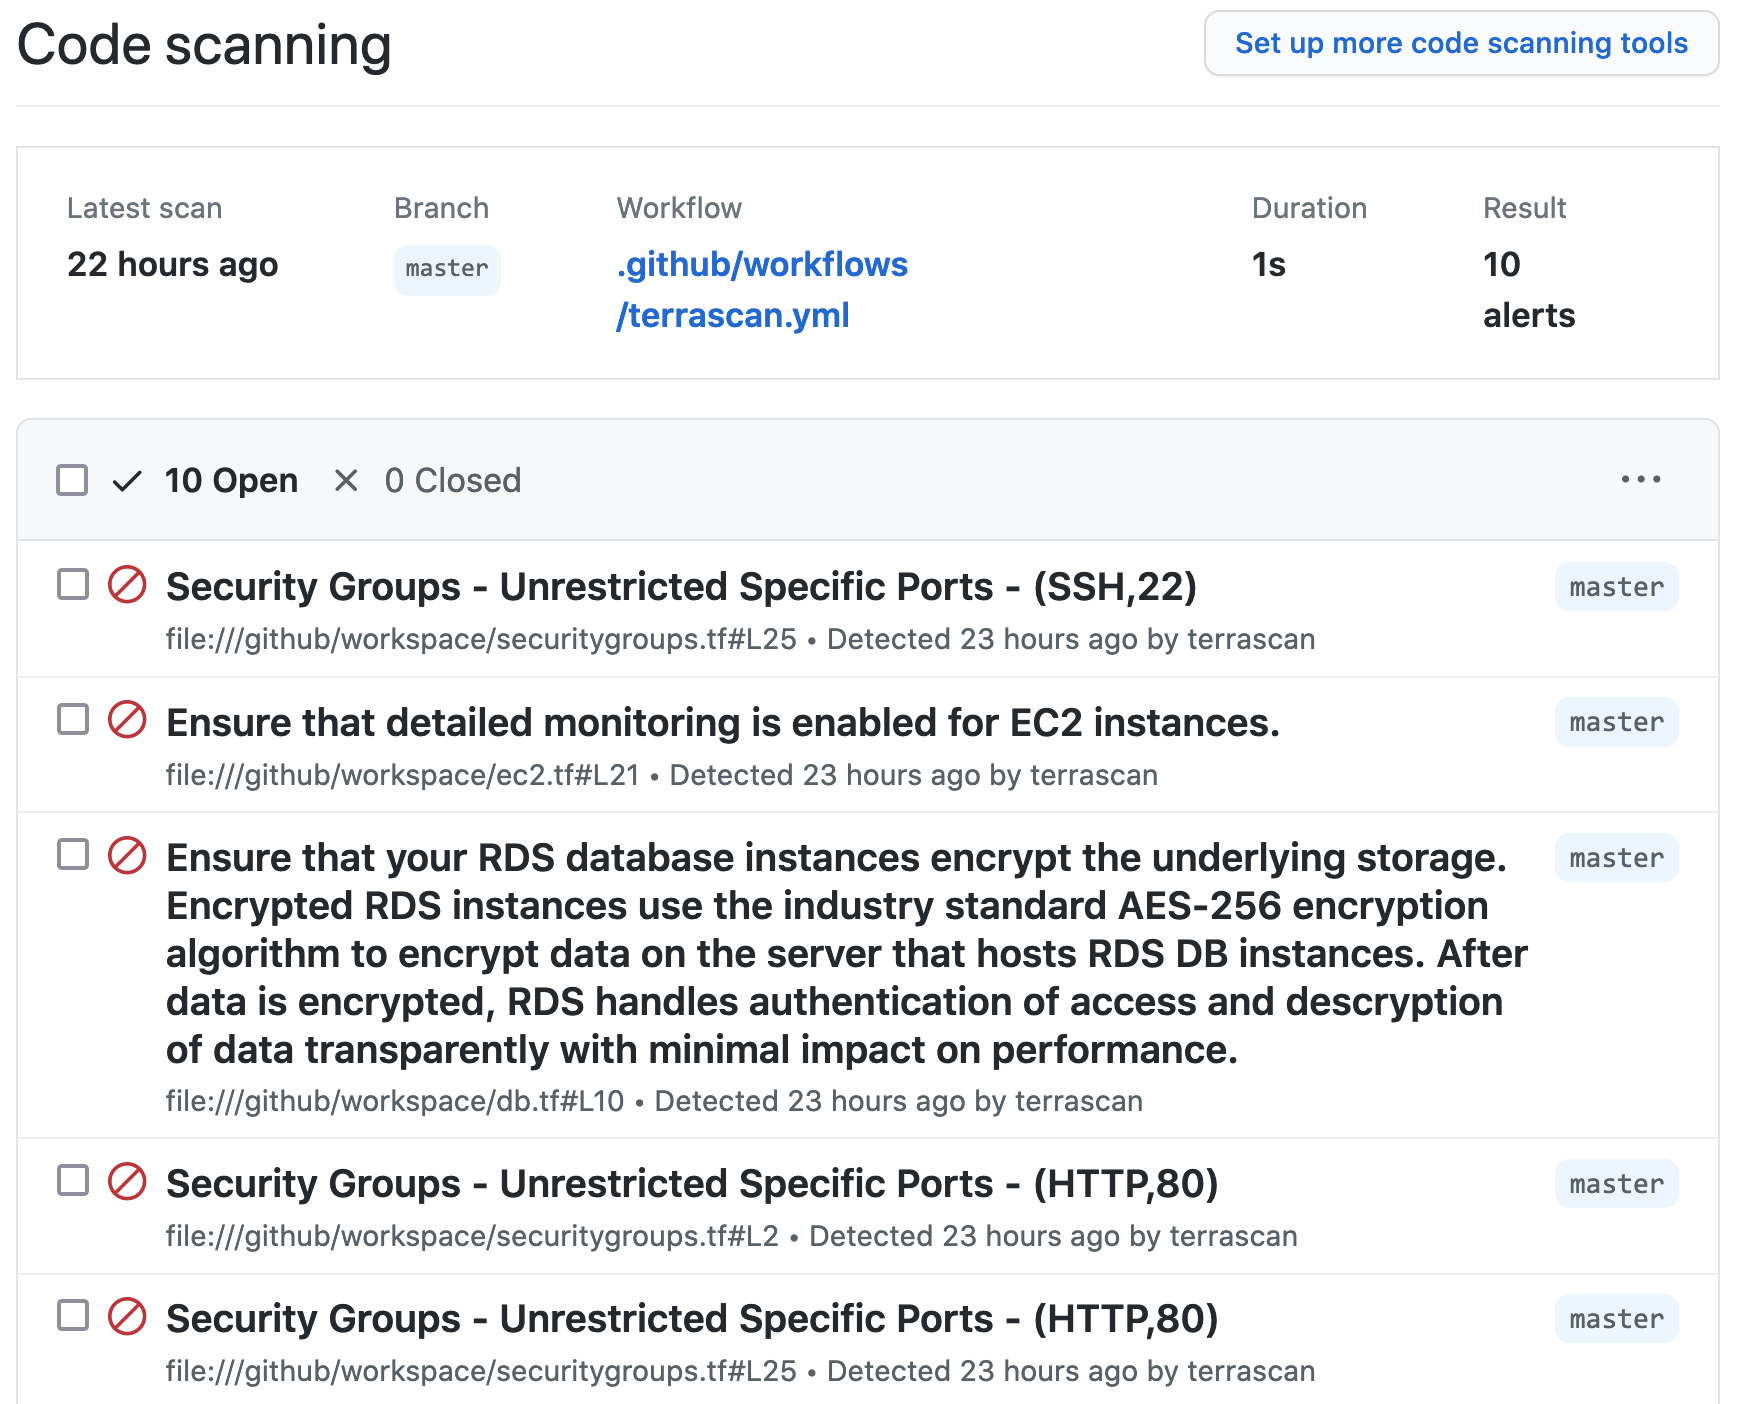
Below is an example workflow configuration where the action is configured to scan a repository including Terraform v14+ HCL files for AWS resources and the SARIF output of the scan is uploaded to GitHub code scanning.
on: [push]

jobs:
  terrascan_job:
    runs-on: ubuntu-latest
    name: terrascan-action
    steps:
    - name: Checkout repository
      uses: actions/checkout@v2
    - name: Run Terrascan
      id: terrascan
      uses: tenable/terrascan-action@main
      with:
        iac_type: 'terraform'
        iac_version: 'v14'
        policy_type: 'aws'
        only_warn: true
        sarif_upload: true
        #non_recursive:
        #iac_dir:
        #policy_path:
        #skip_rules:
        #config_path:
    - name: Upload SARIF file
      uses: github/codeql-action/upload-sarif@v1
      with:
        sarif_file: terrascan.sarif
A detailed explanation of the action’s input variables is available in the terrascan-action repository.
GitLab CI
GitLab CI can use Docker images as part of a pipeline. We can take advantage of this functionality and use Terrascan’s docker image as part of your pipeline to scan infrastructure as code.
To do this you can update your .gitlab-ci.yml file to use the “accurics/terrascan:latest” image with the [“bin/sh”, “-c”] entrypoint. Terrascan can be found on “/go/bin” in the image and you can use any Terrascan command line options according to your needs. Here’s an example .gitlab-ci.yml file:
stages:
  - scan

terrascan:
  image:
    name: tenable/terrascan:latest
    entrypoint: ["/bin/sh", "-c"]
  stage: scan
  script:
    - /go/bin/terrascan scan .
Argo CD Application PreSync Hooks
Terrascan can be configured as an Argo CD job during the application sync process using resource hooks. The PreSync resource hook is the best way to evaluate the kubernetes deployment configuration and report any violations.

Adding the Terrascan job consists of two steps:
- Creating a container which runs Terrascan
- Configuring a PreSync hook which uses that container
We’ll address the PreSync hook first.
The following example hooks yaml is mostly ready to be added to an existing kubernetes configuration. Just make sure the secrets volume is relevant, specify your new Terrascan container image, and make sure the embedded script scans your repo and sends notifications to your Slack webhook endpoint.
apiVersion: batch/v1
kind: Job
metadata:
  generateName: terrascan-hook-
  annotations:
    argocd.argoproj.io/hook: PreSync
spec:
  ttlSecondsAfterFinished: 3600
  template:
    spec:
      volumes:
      - name: secret-volume
        secret:
          secretName: ssh-key-secret
      containers:
      - name: terrascan-argocd
        image: "<your container namespace>/<your container build from step #2 below>:<hash>"
        command: ["/bin/ash", "-c"]
        args:
        - >
          cp /etc/secret-volume/ssh-privatekey /home/terrascan/.ssh/id_rsa &&
          chmod 400 /home/terrascan/.ssh/id_rsa &&
          /go/bin/terrascan scan -r git -u <git URL to scan> -i k8s -t k8s | /home/terrascan/bin/notify_slack.sh webhook-tests argo-cd https://hooks.slack.com/services/TXXXXXXXX/XXXXXXXXXXX/0XXXXXXXXXXXXXXXXXX
        volumeMounts:
          - name: secret-volume
            readOnly: true
            mountPath: "/etc/secret-volume"
      restartPolicy: Never
  backoffLimit: 1
As shown, the PreSync requires access to the repository where IaC is stored, using the same branch (default) as the Argo CD application pipeline.
For non-public repositories, the private key needs to be added as a kubernetes secret.
  kubectl create secret generic ssh-key-secret \
    --from-file=ssh-privatekey=/path/to/.ssh/id_rsa \
    --from-file=ssh-publickey=/path/to/.ssh/id_rsa.pub
Configuring the job to delete only after the specified time see ttlSecondsAfterFinished will allow users to check for violations in the User Interface, the alternative is through notifications.
Step 2: Create Terrascan container
The container which runs Terrascan can be built using the following files: known_hosts, notify_slack.sh, Dockerfile.
known_hosts
The known_hosts file ensures that the container will be able to clone your project’s git repository in order to scan it. Hashes for the most common public repository hosts are included here, and you may add hashes for any private hosts which you need to access in order to clone your project.
# known_hosts
github.com,192.30.255.113 ssh-rsa AAAAB3NzaC1yc2EAAAABIwAAAQEAq2A7hRGmdnm9tUDbO9IDSwBK6TbQa+PXYPCPy6rbTrTtw7PHkccKrpp0yVhp5HdEIcKr6pLlVDBfOLX9QUsyCOV0wzfjIJNlGEYsdlLJizHhbn2mUjvSAHQqZETYP81eFzLQNnPHt4EVVUh7VfDESU84KezmD5QlWpXLmvU31/yMf+Se8xhHTvKSCZIFImWwoG6mbUoWf9nzpIoaSjB+weqqUUmpaaasXVal72J+UX2B+2RPW3RcT0eOzQgqlJL3RKrTJvdsjE3JEAvGq3lGHSZXy28G3skua2SmVi/w4yCE6gbODqnTWlg7+wC604ydGXA8VJiS5ap43JXiUFFAaQ==
bitbucket.org,104.192.141.1 ssh-rsa AAAAB3NzaC1yc2EAAAABIwAAAQEAubiN81eDcafrgMeLzaFPsw2kNvEcqTKl/VqLat/MaB33pZy0y3rJZtnqwR2qOOvbwKZYKiEO1O6VqNEBxKvJJelCq0dTXWT5pbO2gDXC6h6QDXCaHo6pOHGPUy+YBaGQRGuSusMEASYiWunYN0vCAI8QaXnWMXNMdFP3jHAJH0eDsoiGnLPBlBp4TNm6rYI74nMzgz3B9IikW4WVK+dc8KZJZWYjAuORU3jc1c/NPskD2ASinf8v3xnfXeukU0sJ5N6m5E8VLjObPEO+mN2t/FZTMZLiFqPWc/ALSqnMnnhwrNi2rbfg/rd/IpL8Le3pSBne8+seeFVBoGqzHM9yXw==
gitlab.com,172.65.251.78 ecdsa-sha2-nistp256 AAAAE2VjZHNhLXNoYTItbmlzdHAyNTYAAAAIbmlzdHAyNTYAAABBBFSMqzJeV9rUzU4kWitGjeR4PWSa29SPqJ1fVkhtj3Hw9xjLVXVYrU9QlYWrOLXBpQ6KWjbjTDTdDkoohFzgbEY=
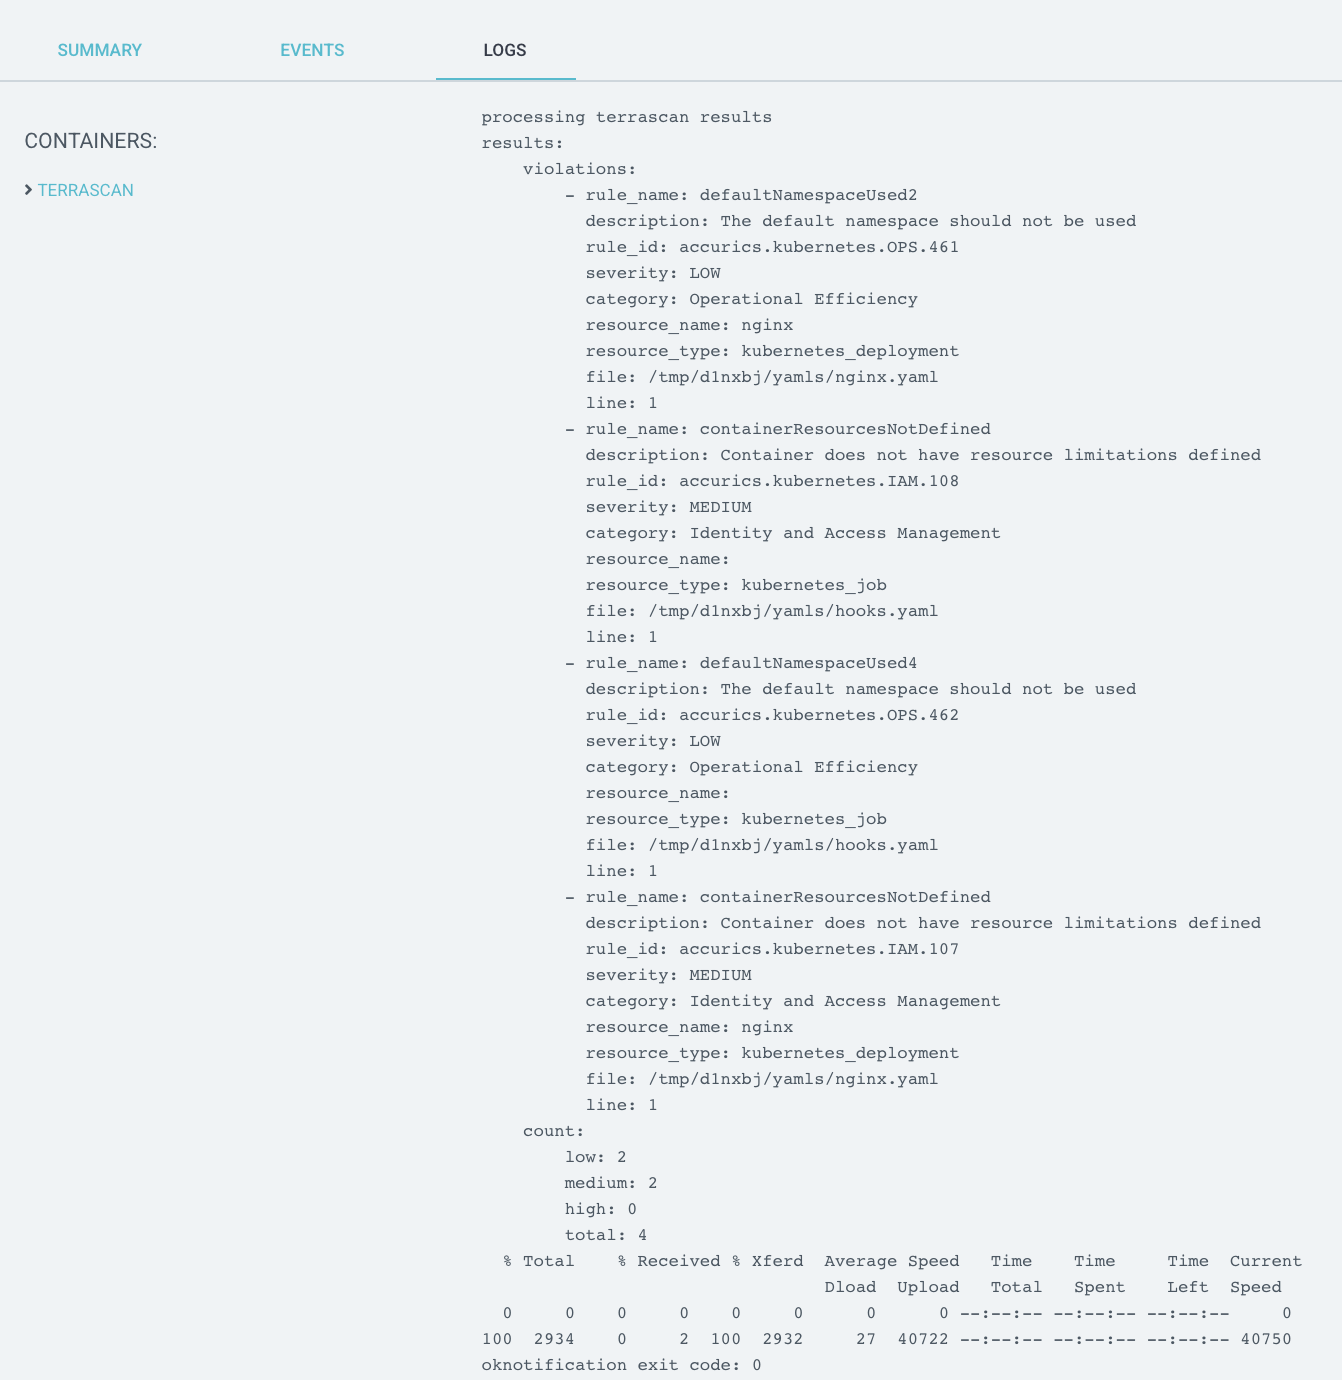
notify_slack.sh
The notify_slack.sh script is used to send a Slack notification after the scan completes. This example expects the channel name, username, and webhook URL to be passed as command line arguments from the PreSync hook which invokes this container. You may modify this script if you wish to send notifications in a different way.
#!/bin/ash
# notify_slack.sh

function send_slack_notificaton {
  channel=$1
  username=$2
  slack_hook=$3

  curl -X POST --data-urlencode payload="{\"channel\": \"#${channel}\", \"username\": \"${username}\", \"text\": \" \`\`\` $(cat results.out) \`\`\` \", \"icon_emoji\": \":ghost:\"}" ${slack_hook}
}

if [ -p /dev/stdin ]; then
  echo "processing terrascan results"
  while IFS= read line; do
          echo "${line}" | tr '\\"' ' ' >> results.out
  done

  cat results.out

  send_slack_notificaton $1 $2 $3

  echo "notification exit code: $?"
else
  echo "no response skipping"
fi
Dockerfile
The Dockerfile is, of course, used to build the container. In this case, we start with the official Terrascan image and we add in the above files to ensure we can access the repository and send notifications.
# Dockerfile
  FROM tenable/terrascan:929e377

  ENTRYPOINT []

  USER root

  RUN apk add --no-cache openssh curl

  WORKDIR /home/terrascan

  RUN mkdir -p .ssh && mkdir -p bin

  COPY known_hosts .ssh

  COPY notify_slack.sh bin/

  RUN chown -R terrascan:terrascan .ssh && \
      chown -R terrascan:terrascan bin && \
      chmod 400 .ssh/known_hosts && \
      chmod u+x bin/notify_slack.sh

  USER terrascan

  CMD ["ash"]
Once you’ve built the image and pushed to your container registry, you can add the PreSync hook which will automatically run Terrascan during the application sync process.
5 - Pre-commit hook
Integrating Terrascan with Pre-commit to detect vulnerabilities in your IaC before you commit them.
Integrating Terrascan with Pre-commit
Overview
Terrascan scan can be used as a pre-commit hook in order to automatically scan your IaC before every commit.
For more information about pre-commit hooks see https://pre-commit.com/#intro
Requirements
Integration Method
Add config file
- Add file called .pre-commit-config.yaml to root of repo you wish to scan with pre-commit. It should look like this:
repos:
    - repo: https://github.com/tenable/terrascan
        rev: <COMMIT/VERSION>
        hooks:
        - id: terraform-pre-commit
            args: [ '-i <IAC PROVIDER>'] #optional
Note:
The optional args line allows you to specify the IaC provider. For example,
repos:
    - repo: https://github.com/tenable/terrascan
        rev: <COMMIT/VERSION>
        hooks:
        - id: terraform-pre-commit
            args: [ '-i k8s']
will cause
to run and thus scan kubernetes yaml files. You may exclude the args like so:
repos:
    - repo: https://github.com/tenable/terrascan
        rev: <COMMIT/VERSION>
        hooks:
        - id: terraform-pre-commit
which causes the default
to be run, scanning all IaC provider types.
Once you have everything installed, and add the appropriate config file to your repo,
'terrascan scan -i <IAC PROVIDER>'
everytime you attempt to commit your staged changes. You can also call the hook directly on all files using pre-commit run –all-files